
DIY firmware and case for divers
Nitrox Analyser
Build your own compact ESP32-S3 oxygen analyser, reuse a galvanic O2 cell you already trust, and print cylinder labels over Bluetooth. No coding experience is required: the launch build is being finalised now and release notifications open ahead of the public installer in a few days.
Launching in a few days
Get an email when the Nitrox Analyser release is ready.
The public firmware installer, production payment keys, and final activation flow are staying closed until the release build is verified. Sign up here and I will send a short email when the installer and licence purchase are ready.
- No firmware flashing or payment is needed yet.
- The launch email will include the installer link, licence details, and build notes.
- Your address is used only for this release notification.
Build yourself
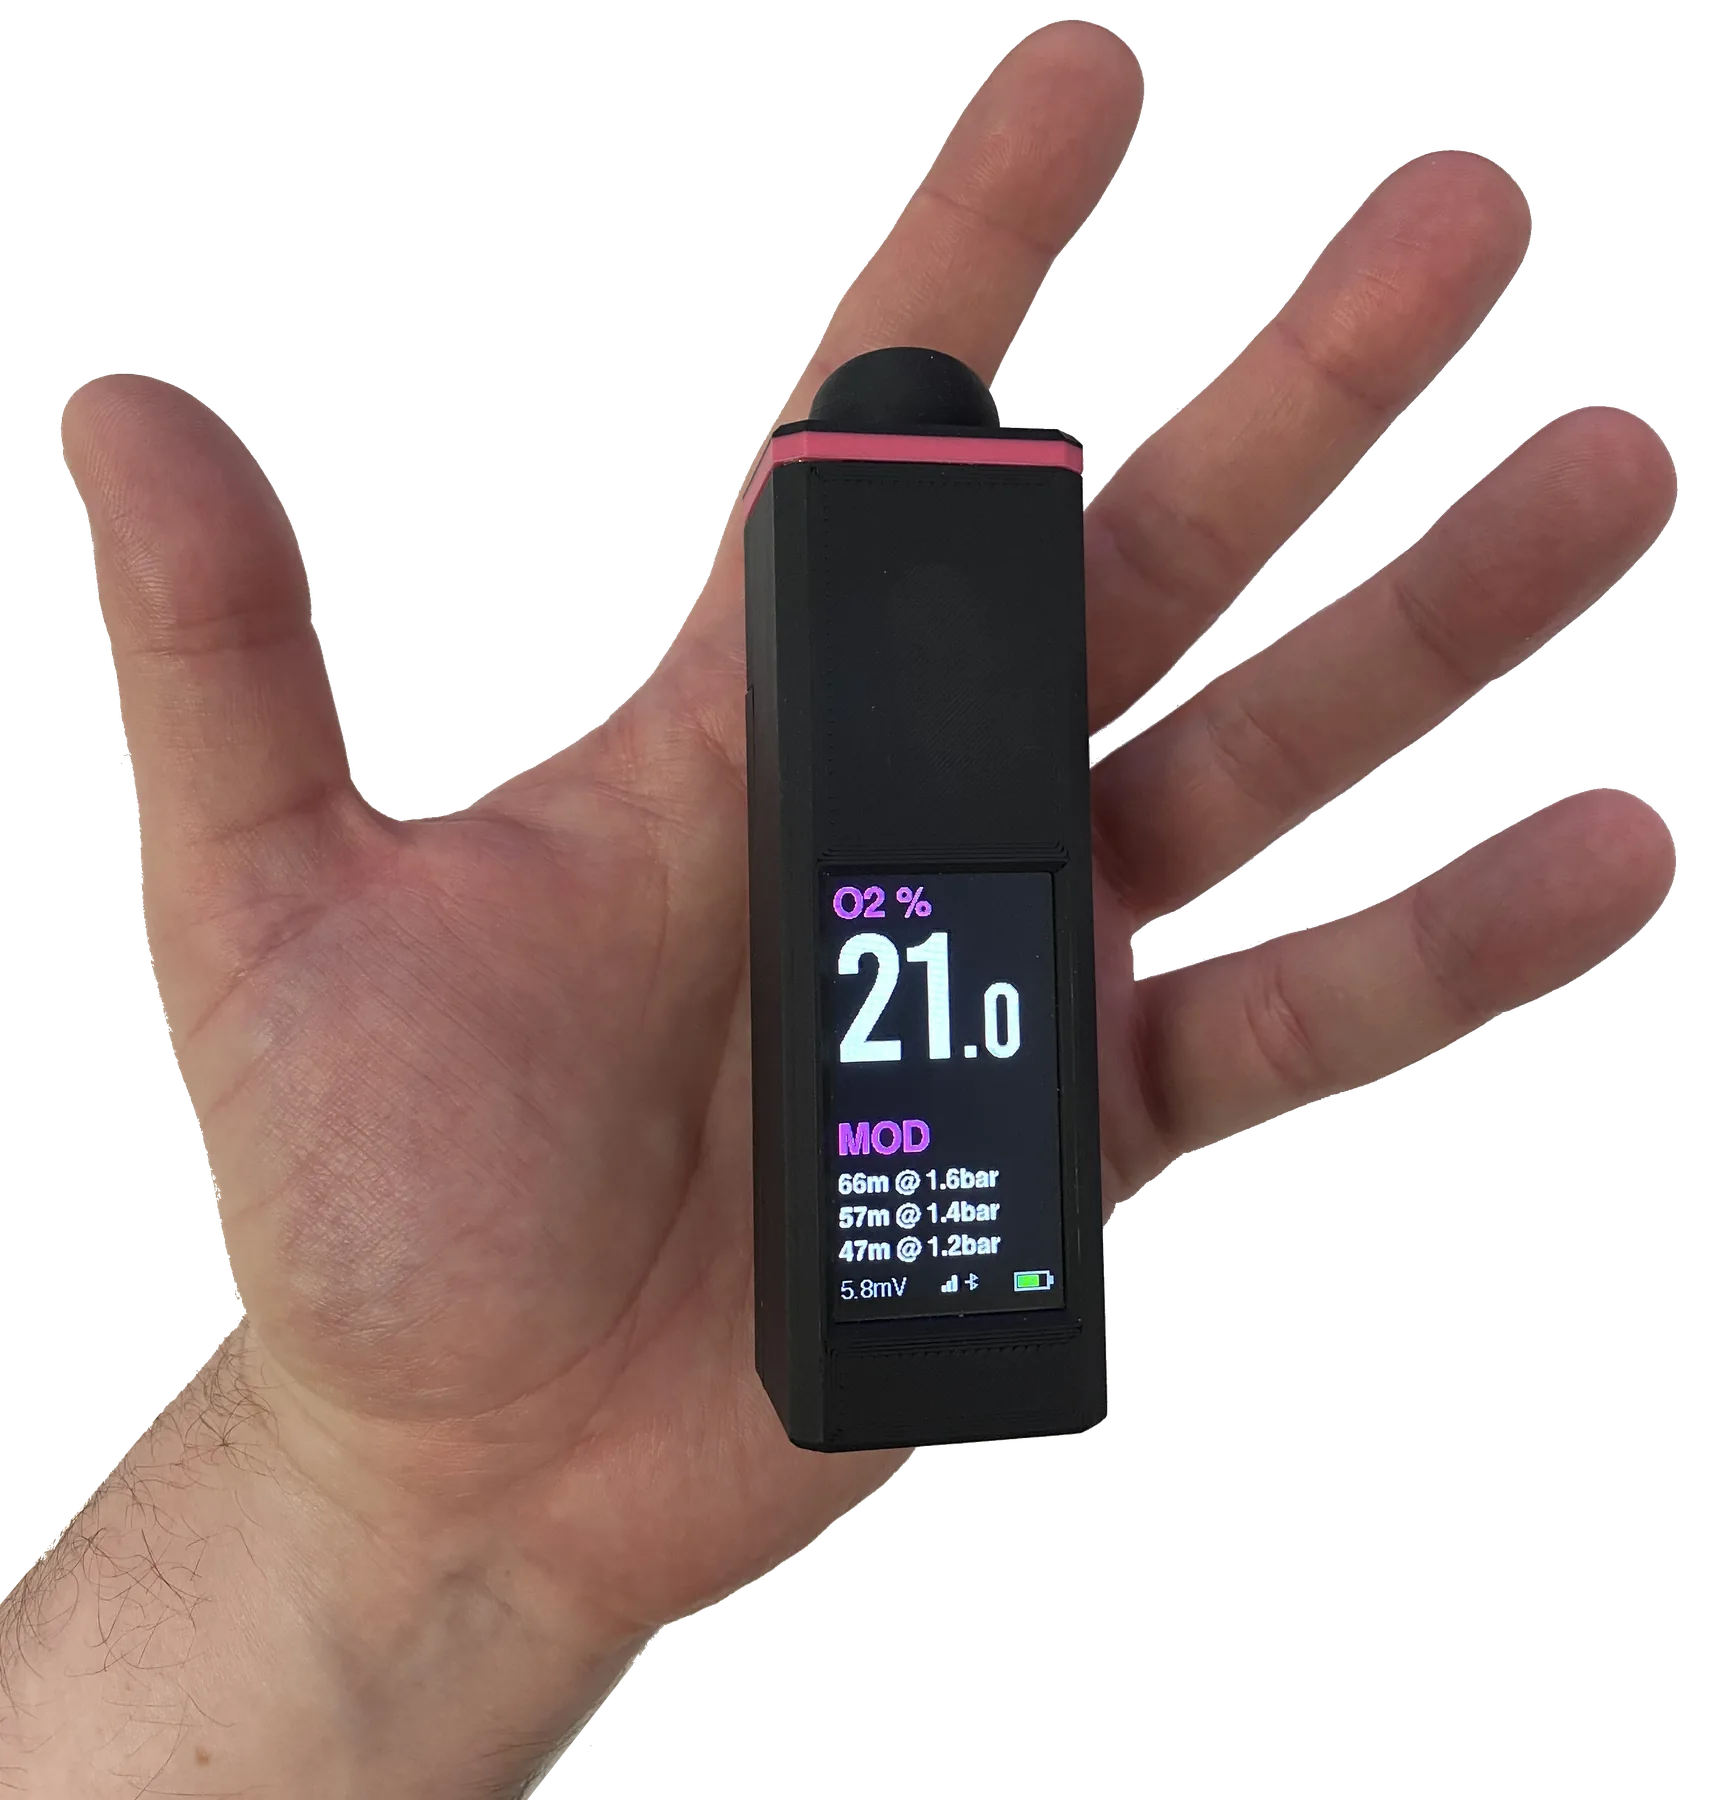
A small analyser built from parts you source yourself.
This is for divers who are comfortable assembling their own kit. Print the housing, assemble the case around a LilyGo T-Display S3, wire the ADS1115, and connect a galvanic O2 sensor cell you already have or can source separately. The software side is ready to flash from this website.
- Fits in the palm of your hand once assembled.
- Case uses the supplied 3MF print file from the product download package.
- No electronics are sold here; you source, solder a few wires, flash, and verify the device.
Measure and calculate
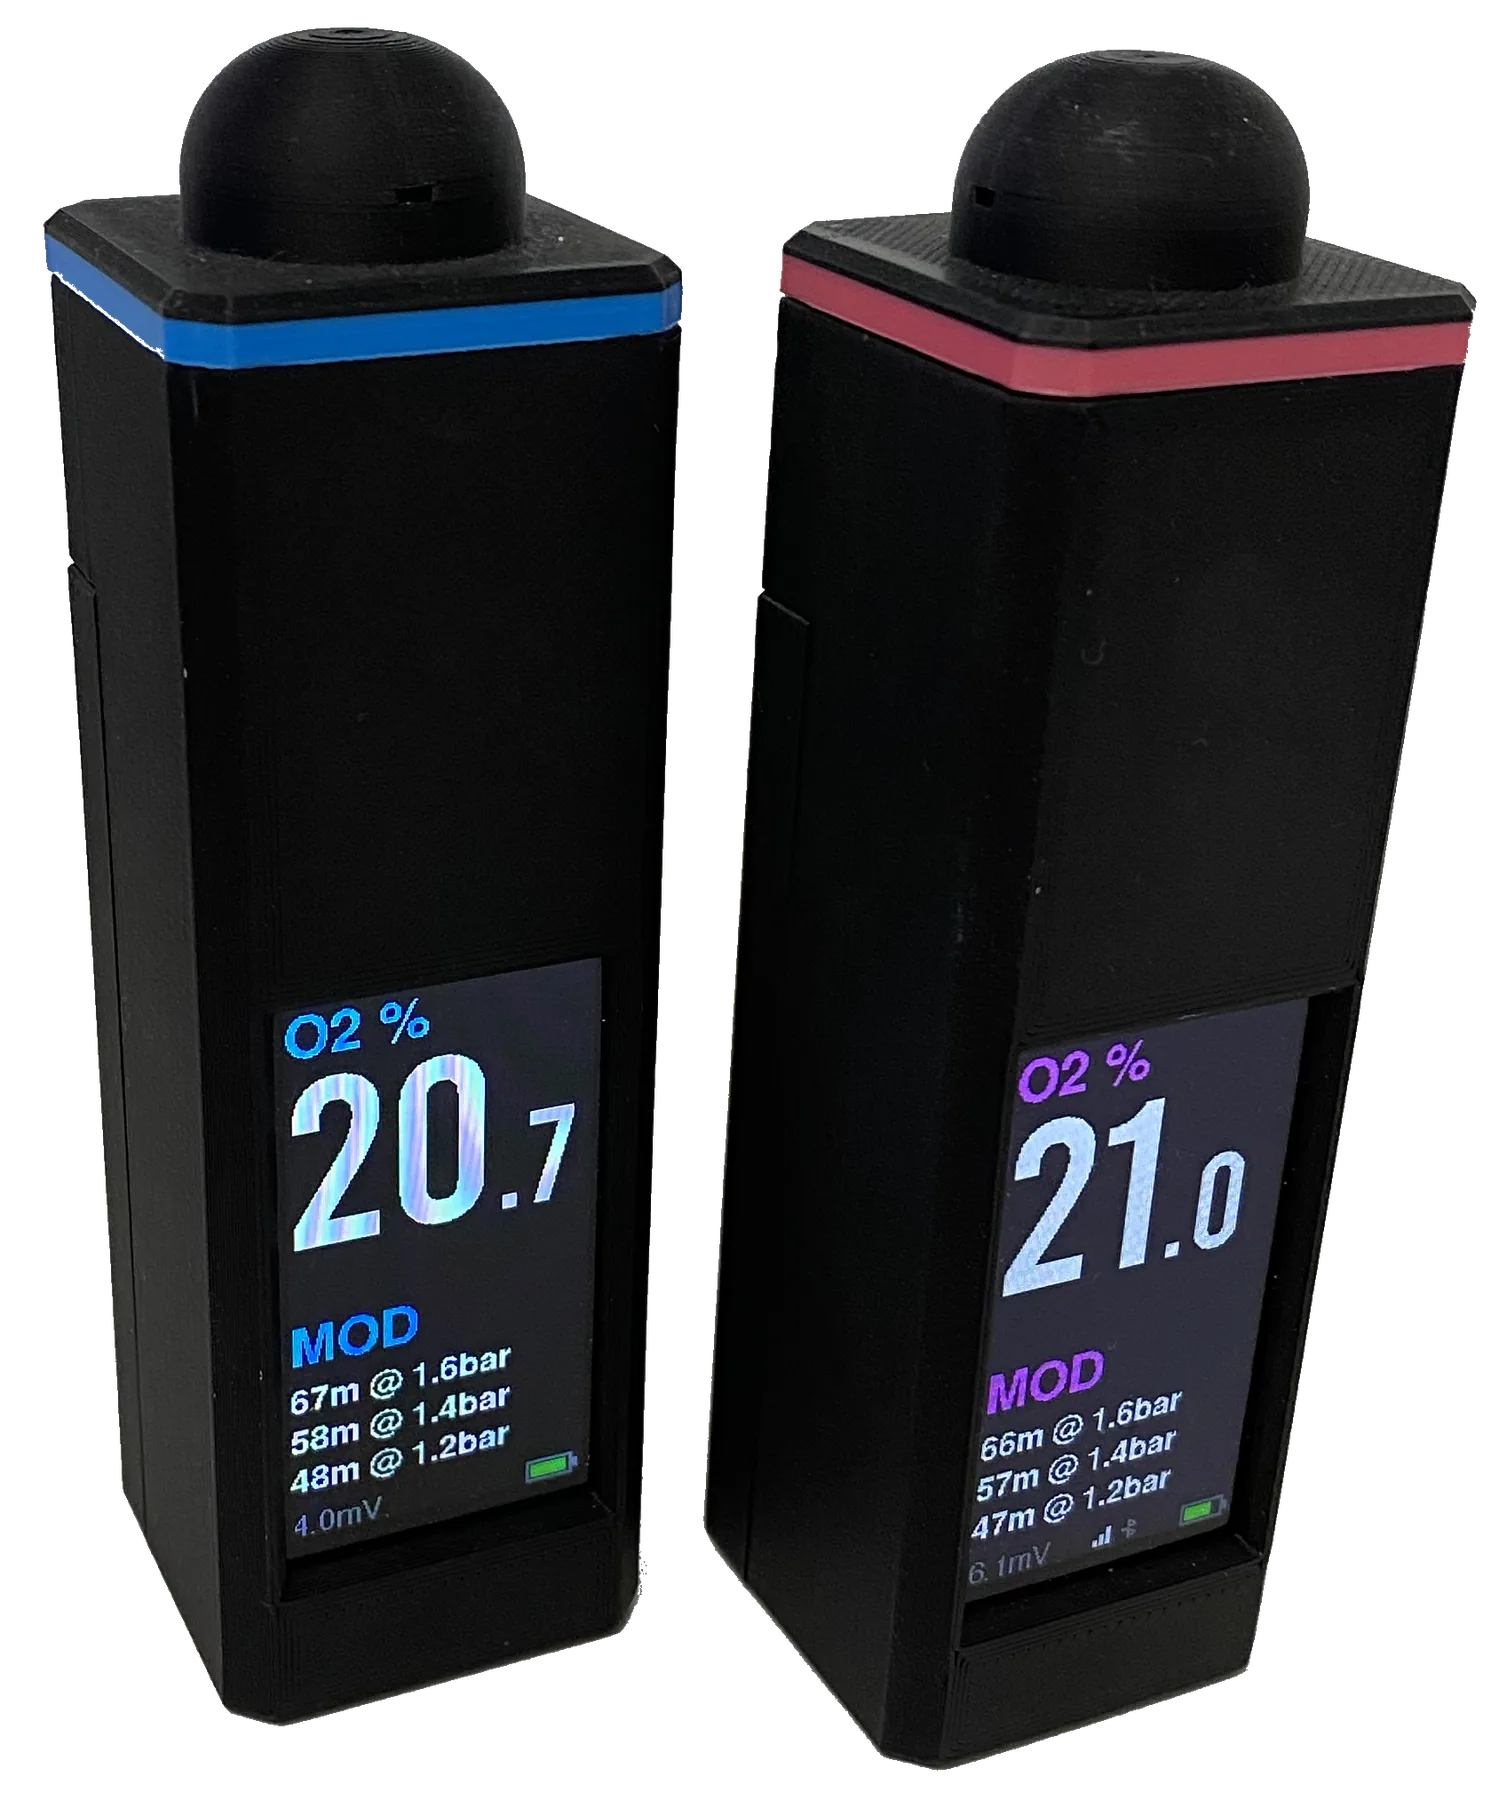
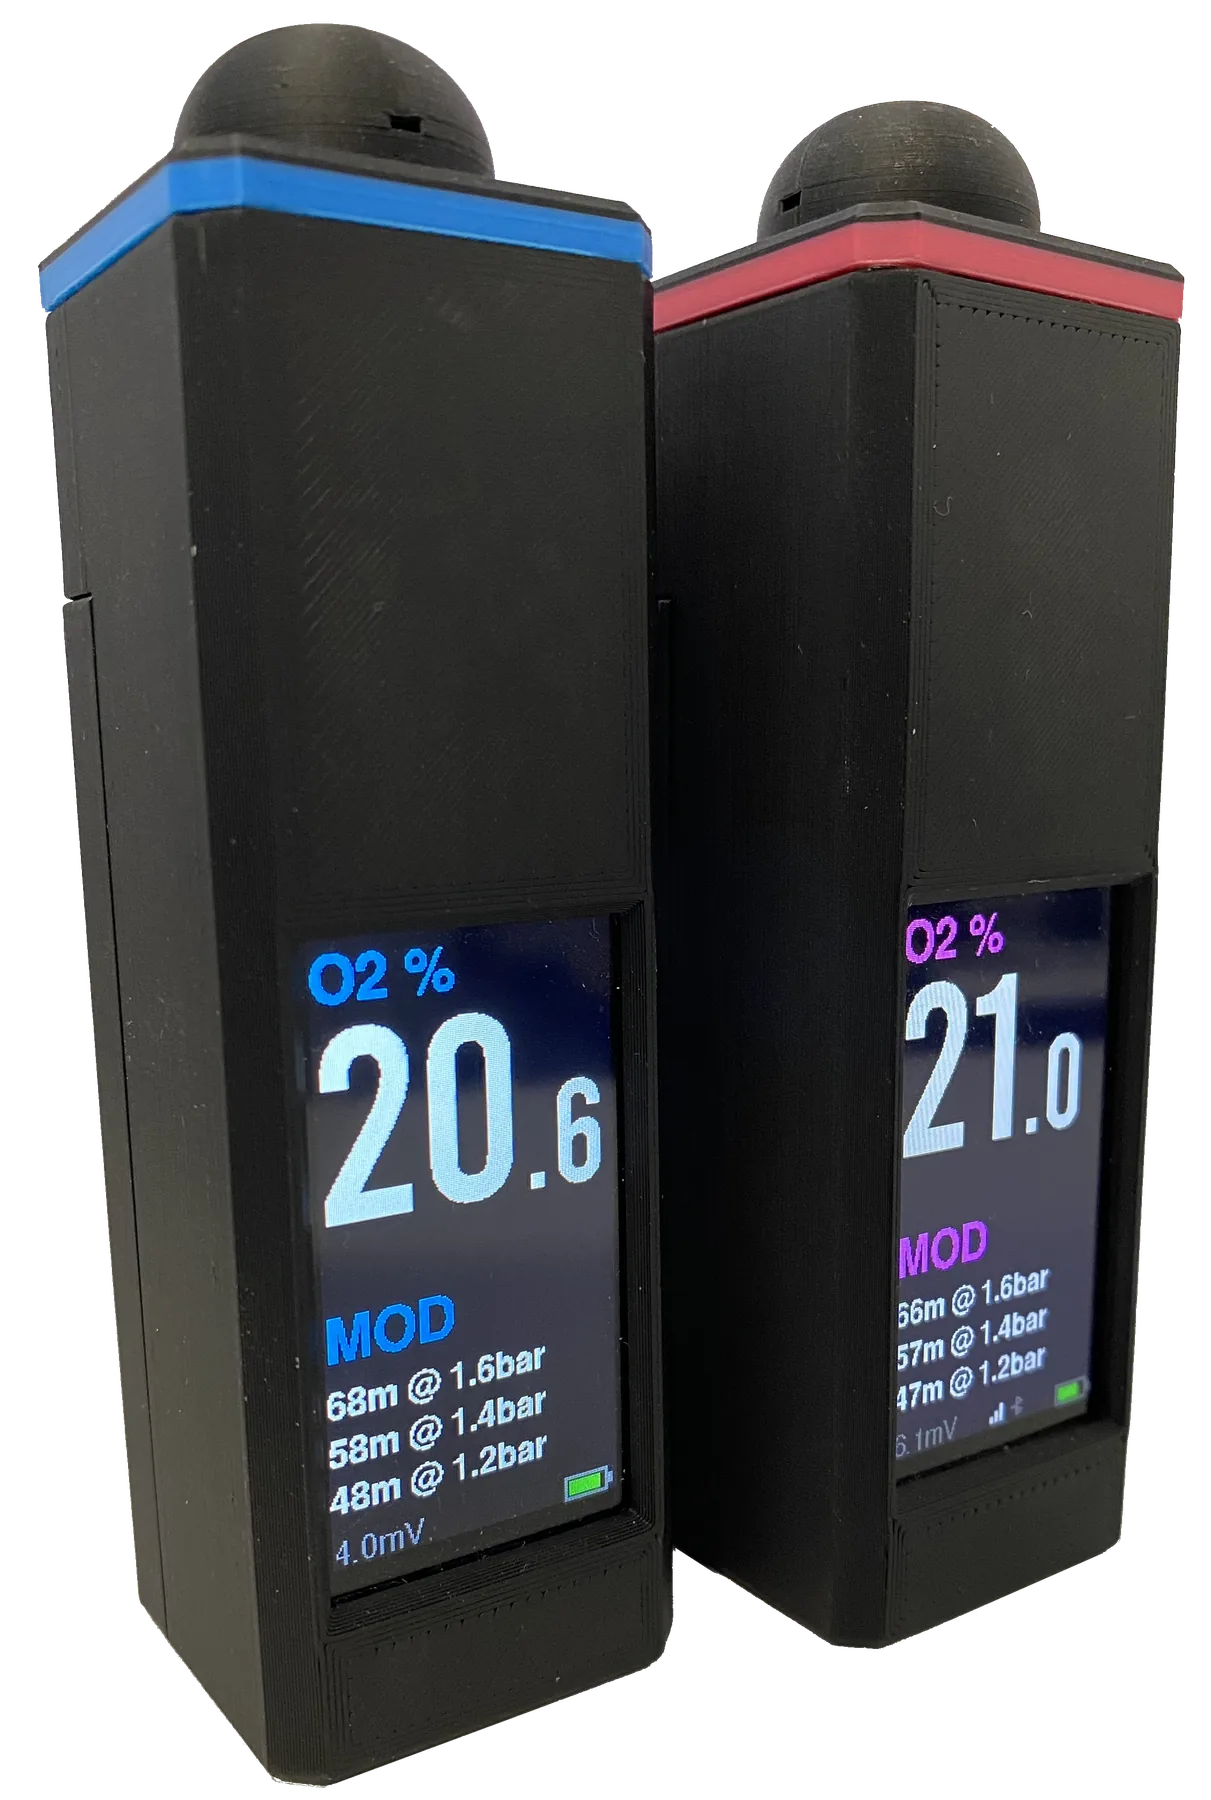
Clear O2 and MOD readings on the device.
The firmware reads the oxygen cell through the ADC, shows the current oxygen percentage, and calculates MOD values for common pO2 settings directly on the colour display.
- Single-point air calibration is stored on the device.
- Battery state and sensor millivolts are visible while analysing.
- The Web UI exposes settings, owners, history, diagnostics, WiFi, and updates.
Bluetooth label printing
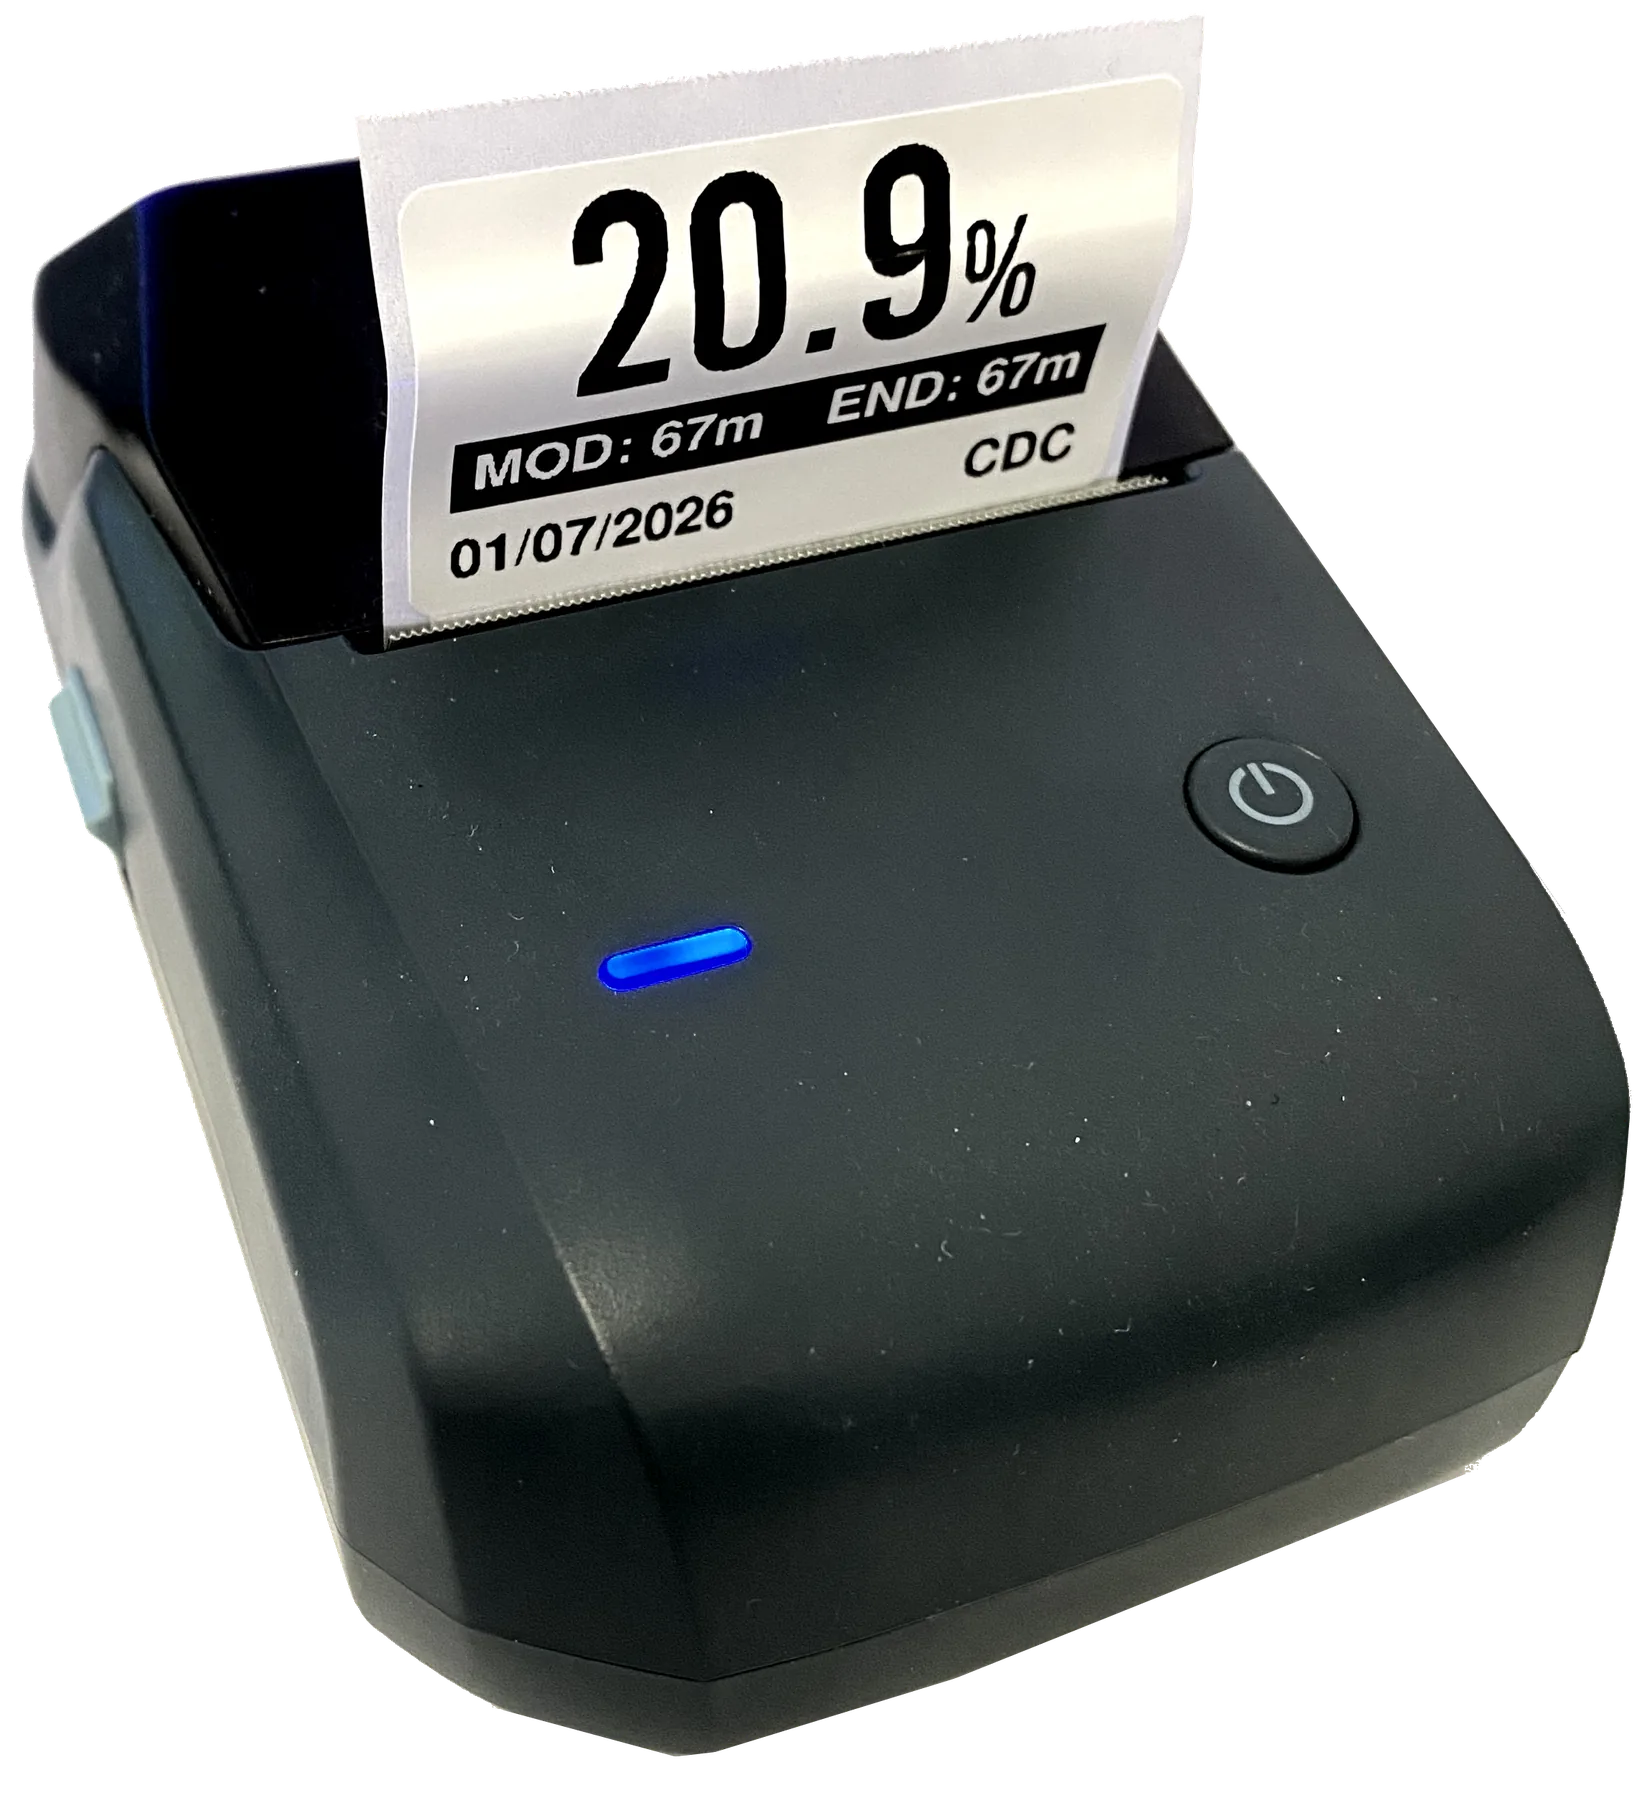
Send a finished MOD label straight to a Niimbot printer.
Pair a supported Niimbot B1 or B21 printer and the analyser can print a gas sticker with O2 percentage, MOD, END, date, and owner name. It keeps the bench workflow simple: analyse, confirm, print, stick the label on the cylinder.
- Owner names are stored for repeated label printing.
- Print history is kept in the local Web UI.
- Update-only flashing keeps printer, WiFi, owner, history, and license settings.
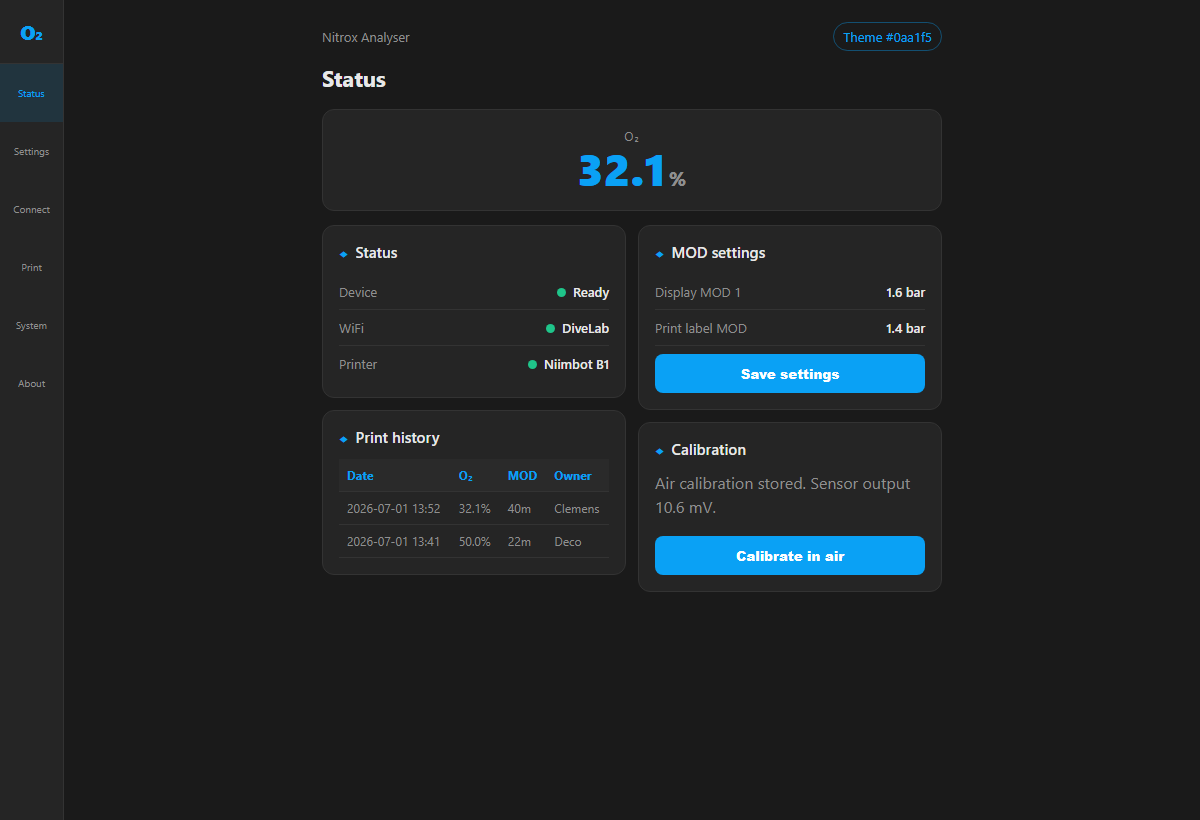
Device Web UI
Configure, calibrate, pair printers, and update from the browser.
The local Web UI uses the same blue theme as this site and gives you access to live O2 readings, calibration, MOD settings, owner names, print history, WiFi, OTA updates, diagnostics, and licensing.
- Works from a phone, tablet, or laptop on the same network.
- Settings stay on the device and survive update-only flashing.
- The Web UI is part of the firmware; no app store install is needed.
Shopping list
Parts for the Nitrox Analyser
We provide firmware, documentation, and the supplied case file. You source the electronics, reuse or buy a suitable oxygen sensor cell, solder the analyser, flash it over USB from the website, and verify it against known gases before diving. You do not need to compile code or install developer tools.
| Qty | Part | Purpose |
|---|---|---|
| 1 | LilyGo T-Display S3 | ESP32-S3 board with TFT display, USB-C, battery charging, and PMU. |
| 1 | ADS1115 module | 16-bit ADC for reading the low-voltage oxygen cell signal. |
| 1 | Galvanic oxygen sensor cell | R-17D, R-22D, or equivalent cell suitable for your analyser design. |
| 1 | 3.7V LiPo battery | Usually 500-1000mAh; often included or directly supported by the board. |
| 1 | Momentary push button | One-button menu and print control. |
| 1 each | 22k and 10k resistors | USB detection voltage divider. |
| 12 | 6x3mm neodymium magnets | Magnetic closure for the printed housing. |
| - | Wire, connector to match your sensor, printed case, screws and heat inserts/adhesive as needed | Final assembly and sensor connection. |
| Optional | Niimbot B1/B21 printer | Bluetooth gas label printing. |
Tools
What you need on the bench
Soldering iron, multimeter, heat-shrink, wire cutters, USB-C cable, and a printed case.
Skill level
No coding experience required
Flash via the website, assemble the case, solder a few wires, calibrate, and verify against known gas.
Assembly and soldering
Nitrox Analyser pinout
Keep sensor wiring short, strain-relieved, and away from noisy power leads. The oxygen cell is a tiny millivolt source, so check polarity before soldering and verify the reading in air before closing the case.
| Connection | LilyGo / module pin | What to solder |
|---|---|---|
| O2 cell + | ADS1115 A0 / AIN0 | Positive oxygen cell signal to ADS1115 A0. |
| O2 cell - | ADS1115 A1 / AIN1 | Negative oxygen cell signal to ADS1115 A1. |
| ADS1115 power | 3.3V and GND | Power the ADC from 3.3V only, with common ground to the ESP32. |
| ADS1115 I2C | GPIO17 SCL, GPIO18 SDA | Connect ADS1115 SCL to GPIO17 and SDA to GPIO18. Tie ADS1115 ADDR to GND. |
| Button | GPIO3 and GND | Momentary push button to ground; firmware uses the internal pull-up. |
| USB detect | GPIO13 | USB 5V through 22k to GPIO13, then 10k from GPIO13 to GND. |
| Battery | BAT+ and BAT- | Single-cell 3.7V LiPo connected to the LilyGo battery connector or pads. |
- Never feed 5V into a 3.3V GPIO. The USB-detect input needs the resistor divider.
- Do not put power through the oxygen cell. The cell feeds only the ADS1115 inputs.
- After soldering, power by USB first, check ADS1115 detection, then calibrate in clean air.
Wiring diagram
Connect the oxygen cell through the ADS1115.
Common galvanic oxygen cells such as R-17D, R-22D, or compatible analyser cells are supported when they produce a small millivolt signal. Check cell polarity with a multimeter, expect roughly single-digit to low-teens millivolts in air for many cells, and never power the cell.

Printed housing
Print the case, then build into it.
The case is designed around the LilyGo T-Display S3, the ADS1115 module, the O2 cell connector, and magnetic closure. Use the supplied 3MF case file from the product download package.
3MF case file included in the software package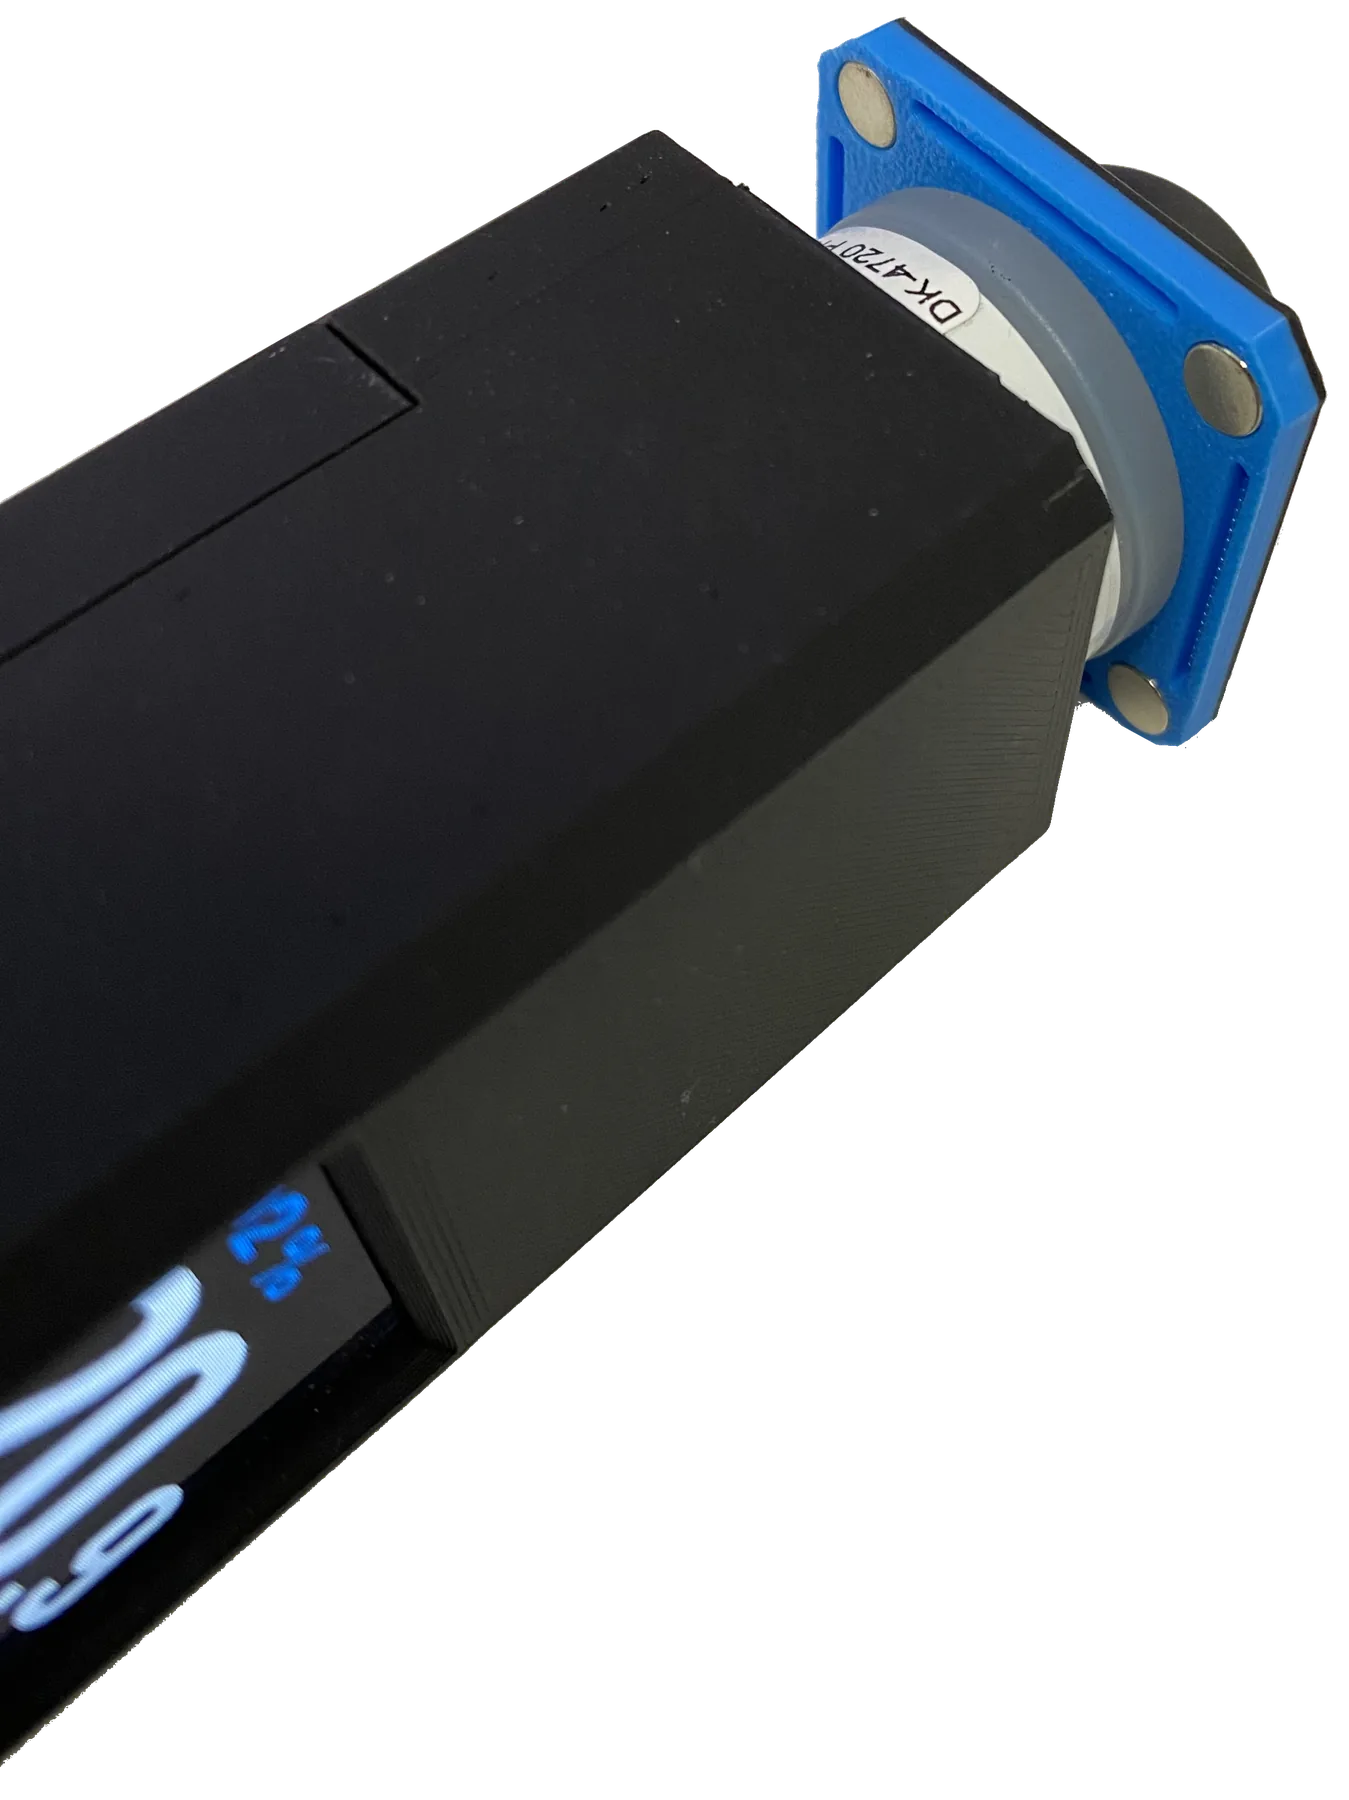
Reuse what you have
Made for existing cells, spare parts, and workshop builds.
The intention is not to sell another closed analyser box. It is firmware, a printable housing, and a simple build path for people who already have oxygen sensors, printers, ESP32 boards, or the confidence to source them.
Simple build path
Build it in five steps
- Print the housing. Use the supplied 3MF case file, fit the magnets, and dry-fit the board and sensor path.
- Wire the electronics. Use the pinout above to connect ADS1115 over I2C, wire the O2 cell to A0/A1, add the button, USB-detect divider, and battery.
- Flash the firmware. Open the USB installer in desktop Chrome or Edge, select Nitrox Analyser, then use full install for a new board. No coding or firmware build step is needed.
- Configure and calibrate. Start the device, connect to the Web UI if needed, pair a printer, then calibrate in clean air at 20.9% O2.
- Verify before use. Compare against known gas or a trusted analyser and verify every label before it goes on a cylinder.
Cost before you install
The hardware is DIY. The analyser software is licensed separately.
We do not sell the electronics, oxygen sensor, battery, printer, or finished analyser. You source and build those yourself. The Nitrox Analyser firmware licence costs about the price of one twinset Nitrox fill, so know this before flashing and activating the analyser. Public purchase opens with the release in a few days.
Nitrox analyser firmware, Web UI, OTA updates, and Bluetooth label printing.
Checkout is not open yet. When the final release is ready, the website will explain the licence flow before payment and activation.
USB flashing
The browser installer opens in a few days
The installer supports update-only and full-install modes. Update-only keeps saved settings intact. Full install is for new boards, recovery, unknown firmware, or partition changes. The public installer opens after the release build and production payment flow are finalised.
- Use desktop Chrome or Edge.
- Connect the ESP32-S3 by USB.
- Select the product and install mode.
- Follow the release email when the installer is opened publicly.
Calibrate and verify
Calibrate in clean air at 20.9% O2, then compare the finished analyser against a trusted analyser or known gas before relying on it. Repeat calibration and verification whenever you change the cell, wiring, housing, battery setup, or firmware.

Also available
Trimix Analyser Connector
Many technical and cave divers already love the Divesoft Trimix analyser. This independent ESP32-S3-Zero adapter connects that analyser to a Niimbot printer for seamless analysis label printing, with Nitrox labels included and Trimix labels available through Pro.
Important safety note
This is DIY diving equipment firmware and documentation, not a finished certified commercial analyser. You are responsible for the build, calibration, wiring, and independent verification. Never rely on a single unverified reading before diving.